Wednesday, November 28, 2007

What in the World IS My House- Part 2

Thank you all for your wonderful comments! I am a few steps closer to figuring out this house's origins and style.

This comment from LisaCarol of NunkProTunk's houses sent me off on a google search to search "pyramidal roof vernacular". I found many houses that looked similar, but lacked the "flat" top and centered chimney/vent. They were generally rectangular in shape, as well. Very close, but not quite!

A few of you suggested a cottage style might be more correct. I searched for "pyramid cottage" and found this picture, courtesy of the Park City (Utah) Historical Society and Museum:
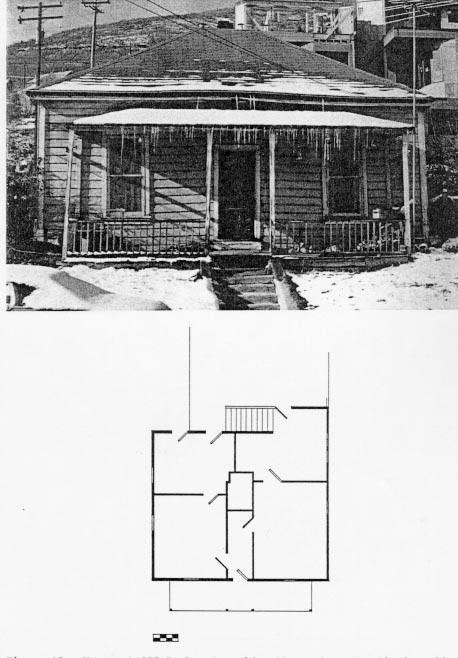
Photo Sharing and Video Hosting at Photobucket
Pyramid cottage
"Named for its characteristic pyramid roof, the pyramid
cottage is described as a four room square building with
a pyramid roof and front porch."
Information from: Deborah Lyn Randall, Park
City Utah: An Architectural History of Mining Town Housing, 1869
to 1907
It's my house on the outside! The porch is a little larger, but everything from the flat topped pyramidal roof to the two windows and the simple porch columns is the same. The floor plan is quite similar, also. Our house does not have an entrance hall and the left two rooms are open to each other. There is also a small bathroom tucked between the right two rooms. I will be interested to see if we see signs of previous walls in those places when we re-floor. There is a square "inset" in the middle of the house, as noted in the floor plan above, as well. This is where our furnace and hot water heater are. I think we might have found a match!

I wanted to find out more information about this house style in Colorado. I expanded my search to include hipped roof houses as well as pyramidal houses and cottages. The houses are very common in railroad, mining, and timber towns of the west.

From the City of Longmont's Historical Preservation, Planning, and Development Services: (all emphasis is mine)
Vernacular Wood Frame
By far the most common style of architecture, vernacular wood frame structures have been built throughout Colorado since 1860. With an absence of architectural features and ornamentation that can distinguish a specific style, these simple, modest homes are divided into types according to floor plan and roof shapes.

The hipped box is a small, one-story structure with hipped roof and usually a front porch. These structures are commonly confused with the more elaborate classic box (Four Square) or Bungalow. Ornamentation is the key to distinguishing between these styles. The hipped box has no decorative elements.
So my house is now a hipped box. BUT WAIT! A survey on history buildings by the city of Pagosa Springs states this:
...the “Hipped Box” classification... is a building type, rather than an architectural style. Hipped Box type buildings are simple one story square (or close to square) buildings with pyramidal hipped roofs. They may have a small covered entry or stoop, but they do not have porches
mmmmm... time to do more research, this time at the library to settle these contradictory statements. I'm hoping to find out more information about the earliest occupants, and possibly even information about the original existence or absence of a front porch.

It is pretty clear that it isn't a classic cottage, as those have a dormer and are generally longer.

Conclusion: My house is either classified as a pyramidal cottage, a hipped box, a pyramidal box, or a hipped cottage. OR... all four are right.

Monday, November 26, 2007

Our Faucet Find

We went to Habitat for Humanity ReStore the other day to browse and LOOK at what I found!
Photo Sharing and Video Hosting at Photobucket
It was $15, and just perfect for our bathroom! It is a perfect replacement for the cheap builder's special faucet that was previously on our sink. It is a new faucet, never used... the "display" faucet from a local big box store. I love the ceramic handles. I hate our sink (but it's new)... this small change helps me like it a lot more.

Sunday, November 25, 2007

Our New Slate Floors

This weekend we installed the slate in our bathroom. It took us 2 days from start to our current stopping point. I was pleasantly surprised to notice that my previous mistake was not noticable on the installed floors.

How to install slate on top of HardiBacker:
1) Dry lay the tiles to make sure they fit. The rubber spacers they sell were somewhat useless with the inconsistent shape of the tiles, so we didn't use them.
Photo Sharing and Video Hosting at Photobucket
2) Use a diamond blade to cut the stone. We dry-cut using a diamond blade on a jigsaw for the detail cuts (such as the circle around the toilet) and a diamond blade on a circular saw for cutting the long straight cuts.
Hints: The jigsaw cuts a nice, smooth, even and nice-looking line, with little to no breakage and crisp edges. The circular saw, on the other hand splintered the edges of the tiles, and chipped off a considerable amount of stone. We used it only for edges that would be hidden.
Photo Sharing and Video Hosting at Photobucket
3) We used a rapid setting mortar so that our toilet (only one in the house) would be usable before sundown. I spread it on the floor with an old rubber spatula and used a 1/2 inch trowel to create those "grooves" in the mortar. After 4 hours, we were able to replace the toilet/
Hints: A drill with a mixing paddle makes quick work of the required 5 minutes of mixing.
Photo Sharing and Video Hosting at Photobucket
5) We installed the grout using sandwich baggies to "pipe" the grout into the cracks. We did this because we are inexperienced at grouting.
Hints: Use lots of warm soapy water to clean up... and wipe every tile at least three times to remove the excess grout.
Photo Sharing and Video Hosting at Photobucket

Photo Sharing and Video Hosting at Photobucket
The finished and dry grout lines. The grout looks darker in real life; it is about the color of cement.
Photo Sharing and Video Hosting at Photobucket
The finished floor!


What and Where and How Much?
  • Laticrete Tri-Poli Sanded Grout- Habitat for Humanity ReStore- $2
  • Ultra Flex Thinset Mortar- All About Floors- $18
  • 1/2 inch trowel- Habitat for Humanity ReStore- $1.25
  • Diamond Blade for jigsaw- Lowes- $5
  • Sponges- Grocery Store- $2
  • Slate Tile- Craigslist- $30
  • Sealer- Habitat for Humanity ReStore- $2
  • Hardibacker- Freecycle and Lowes- $30
  • 1/4 inch trowel- Habitat for Humanity- $2
  • Wax Rings for Toliet- Home Depot- $5
Total Cost for Bathroom Floor: $104.25


Our New Dishwasher

Photo Sharing and Video Hosting at PhotobucketPhoto Sharing and Video Hosting at Photobucket

Tuesday, November 20, 2007

What in the World IS My House?

I have no idea what the architectural classification of my house is. None. I've puzzled over this for quite some time. It doesn't help, of course, that ANYTHING original (except the windows) was removed sometime between 1950 and 1980. So, there are few interior clues.

What I know...
  • It was built in 1911.
  • It sits on a street with 7 other houses that all have the same shape and floorplan (but different construction). There are probably 100 of this house in my city... and I've seen them in other places, as well. We even looked at 2 other versions before buying this one. Some of those houses have Victorian accents, some have very simple accents, some even have Craftsman-esque accents. Some are brick, some are clapboard, some are asbestos (like mine).
  • It was originally a square. A small square, with about 700 square feet, 2 bedrooms, a bathroom, and a living room and kitchen.
  • The house is laid out with a living room/kitchen open space on one side, and the two bedrooms and bathroom (in between the bedrooms) on the other.

Any ideas? I would love to have them!

Refinishing Mahogany Doors

A while ago, we went to Raven Architectural Artifacts in LaSalle. The owners showed us some mahogany veneered solid doors they had accidentally left outside... the finish was peeling, and there was some weather damage to the veneer. They offered them to us for $25 each, so we bought all three. The color is beautiful, and they had original hardware and crystal doorknobs. The finish is very thin, too, and came off quite easy!

These doors were all from the university's 1930's faculty apartments... the apartments were turned into dorms around 2001, and so were gutted of anything nice.

****************************************************************

This door is back in business, as it is going to be the bathroom door in just a few days. It was a closet door in a former life, and so has a full length mirror (in excellent condition) inbedded into it on one side.

We originally stripped this door with a "gentle finish remover". A couple hours, 2 eye masks, 4 pieces of 00 steel wool, and 2 pairs of rubber gloves later, the finish was stripped. We plan to use a random orbit sander to complete the next two.
Yesterday, I spent the day gluing some peeling veneer back into place. I used rubber tipped clamps to hold the wood in place while gluing.
Photo Sharing and Video Hosting at Photobucket

I also used #18 5/8 inch brads to reattach the molding that was holding the mirror into the other side. I need to go buy a small finishing hammer to complete the job, as whacking at the tiny nails beside a mirror was a bit like being an elephant in a china shop.
Today, I may refinish. I may not. The door is incredibly heavy, and I can't lift it myself. But, I may try!

Monday, November 19, 2007

Intalling Hardibacker! YEAH!

We spent Saturday installing Hardiebacker on the floors and walls in preparation for slate. This job went a little better than the sealing!

First, I had to uninstall EVERYTHING. Everything includes the sink and toilet and baseboard. This is the ONLY bathroom in the house... what was I THINKING?
Photo Sharing and Video Hosting at Photobucket
Our new kitchen chair
Photo Sharing and Video Hosting at Photobucket
Removing the sink
Photo Sharing and Video Hosting at Photobucket
This is what the walls look like underneath the baseboards.

First, we cut out the drywall six inches from the floor to accommodate the new cement board. I discovered an old mouse nest, complete with book order forms from the 1980's, a business card for a plumber, and the original floor to the next room, hidden under plywood and carpet.

Then, we cut the HardieBacker into 6 inch strips.
Photo Sharing and Video Hosting at Photobucket
Kirby helped cut with the utility knife
Photo Sharing and Video Hosting at Photobucket
The utility knife version of cutting HardieBacker (score and snap) was essentially useless and time consuming. We had much better luck with a diamond blade attached to our jigsaw. (I LOVE our jigsaw).

After cutting and dry-laying everything, we spread thinset with a 1/4 trowel, laid the HardieBacker on top, and then screwed it down every 4 inches or so, according to the directions. I'm reading directions more carefully these days.

We then replaced the toilet, flushed it, and... WAIT! There's water EVERYWHERE!
After a quick last minute trip to Home Depot 5 minutes before closing for a new wax ring, we have a working toilet!

The (somewhat) finished product...
Photo Sharing and Video Hosting at Photobucket
To be finished this week!

Tips and Hints:
  • Photo Sharing and Video Hosting at PhotobucketThis is the best tool. It does EVERYTHING! I used it to scrape caulk.
  • Don't cut the hardiebacker inside. The dust is caustic. It HURTS!
  • When a screw doesn't "screw", don't keep trying and strip the ONLY drill bit you have that fits those screws, forcing yet another trip to Home Depot.
  • Photo Sharing and Video Hosting at PhotobucketDon't force the HardieBacker into any tight spots. It will break. You will cry, since it is $10 a sheet. Then, you will pretend you never broke it, and lay it down anyway.
  • Always replace the wax ring on a toilet whenever you mess with the floor height. Even if it is only 1/4 inch!
Where is it from?
  • Hardibacker- Freecycle and Lowes
  • Thinset- All About Floors (a local tile shop)
  • Diamond blade- Lowes
  • Wax toilet ring and drill bits- Home Depot
Cost:
  • HardiBacker- $20
  • Thinset- $18
  • Diamond Blade- $5
  • Wax Ring- $5
  • Drill Bits- $2

What Have I DONE?

My beautiful slate! It's watermarked and stained! If you remember, last week I sealed the slate with a penetrating sealer. Apparently, I didn't follow the directions well enough, because this happened!

The directions call for pouring the sealer on, waiting 10 minutes, and wiping the excess off. This seemed like a huge waste of sealer, and somewhat impossible with individual tiles, so I opted to brush it on a few times, wait until the stone was no longer soaking sealer up, and then wipe off the excess sealer. That's what I get for not following instructions!

I have bought a bottle of sealer REMOVER. The current plan is to install the tile as-is, and then treat the whole floor with sealer remover. Then, re-apply the sealer using the EXACT instructions! Sigh.

Friday, November 16, 2007

Look at all the Energy we SAVED!!!

One of the first things we did to our house was install a programmable thermostat. We chose this Honeywell 5-2 Day Programmable Thermostat. $30 later...

This is what we set the thermostat to:
Year 1: 62º (No programmable thermostat)
Year 2: 62º During the Day, 54º at Night and While Gone

Table 1, Monthly Therm Usage

Year 1, Year 2
October: 47 Therms, 30 Therms
November: 24 Therms, 19 Therms
December: 96 Therms, 75 Therms
January: 113 Therms, 63 Therms
February: 69 Therms, 71 Therms
March: 72 Therms, 50 Therms

Average: 70.16, 51.33
Total: 421 Therms, 308 Therms

Table 2, Monthly Outside Temperature

Year 1, Year 2
October: 53º, 56º
November: 44º, 46º
December: 32º, 29º
January: 29º, 38º
February: 37º, 29º
March: 39º, 36º

Average: 39º, 39º

We saved 19 therms a month, simply by installing a programmable thermostat! Installing the thermostat took about 20 minutes of our lives. WELL worth it! We have definitely saved our $30 many times over.

Cost: $30

Wednesday, November 14, 2007

Sealing the Slate

Our bathroom is getting new floors! Goodbye, peeling and cracking blue vinyl... HELLO SLATE! I have been gathering slate for this project for a few months. It's nice... blues, beiges, and greys. But, before I can install it I need to seal it with sealer so that the grout will not stick to it. I am NOT a good grouter, so this is a preventative measure.

Photo Sharing and Video Hosting at Photobucket

Notice the nifty picnic table workbench... it is incredibly useful! The pallets I have gathered to make compost piles (what a slacker) were useful, too. And, maybe when I'm done I can compost all of those LEAVES in them!

Photo Sharing and Video Hosting at Photobucket

To seal the slate, I used a penetrating sealer, brushed on with an old paint brush. I have put two coats on. It's pretty hard to keep the sealer off of the edges of the tiles... I am hoping that a little sandpaper on the edges before installing will help prevent any problems!

I found the sealer... TileLab SurfaceGard Penetrating Sealer at the Habitat for Humanity ReStore for $2 yesterday. It was full, and looks hardly used. There are so many jars, bottles, and cans of such things there, from people who buy it for the 1 tablespoon they need and then donate it.

Where is it from?
Cost:
  • Slate $30
  • Sealer $2

The Great Kitchen Remodel- 70% done

Before:
Photo Sharing and Video Hosting at Photobucket
Notice the white Melamine lower cabinets...
Photo Sharing and Video Hosting at Photobucket
...the window into the laundry room, the badly painted wood upper cabinets, the formica countertop...
Photo Sharing and Video Hosting at Photobucket
...the impromptu "pantry" cabinet and appliance shelf and aging white refridgerator.

After 70% of the work:
Photo Sharing and Video Hosting at Photobucket

Photo Sharing and Video Hosting at Photobucket

Photo Sharing and Video Hosting at Photobucket

Photo Sharing and Video Hosting at Photobucket
What we did:
First, we painted the whole kitchen a nice brick red. It's actually a brown color, but it looks so red! (Hint: Paint AFTER you rip down the old cabinets, not before)
Then, we ripped down all of the existing cabinets. And then we stared at the mess we created!
(hint: ALWAYS use screws to put up cabinets. It makes life so much easier on those who will take them out in 20 years!)

We decided that it would be better to remove the huge window above the sink altogether. This window is on a wall that use to be an exterior wall... and taking that window out took 2 days of carefully hacking away at that exterior wall, and then carefully prying out the NAILS that held it in (ALWAYS USE SCREWS!). Actually framing in the new stained glass window, drywalling, and painting took just a couple hours.
Putting the new cabinets up was much easier than carefully ripping down the old ones.
  • MEASURE THREE TIMES before drilling the holes. We have quite a few random holes in the back of our cabinets to fill because the studs "moved" on us.
  • Use good clamps to hold the cabinets together.
  • Take the doors off first... it really is easier to install a cabinet without doors.
Where did it all come from?
  • Cabinets- Came from a wholesaler in Denver. We searched for about a year for salvaged cabinets that fit our measurements and our requirements, and unfortunately were unable to find any. They are Merillat Cabinets... the cheapest they make, in maple.
  • Microwave-Freecycle
  • Refrigerator- My in-laws. They remodeled their house this past summer, and bought new stainless steel appliances. We got their old almond fridge WITH ICEMAKER! It matches the existing almond and black stove.
Photo Sharing and Video Hosting at Photobucket
  • My gorgeous kitchen light that I drooled over for months- Lowe's... on clearance the week we were redoing the kitchen!
  • Pot Rack- Pier One (a gift card purchase)
  • Table- My in-laws again!
  • Jigsaw- Pawn shop
  • Stained Glass Window- Ebay
  • Nails, screws, drywall, drywall tape, shims, spackle, paint- Lowes
Cost:
  • Cabinets $1450
  • Ceiling Light $45
  • Above Sink Light $15
  • Jigsaw $10
  • Drywall, Screws, Nails, Studs, Shims, Trim, etc-$40
  • Stained Glass Window $50
  • Microwave, Fridge, Table, Chairs- FREE
  • Paint $20
Total: $1630

But it's only 70% done... what is left?

We have granite countertops to make, using a salvaged countertop. This will require us to get up off the couch, drive down to Denver, and use the shop. Here's a picture of the granite... notice the dark red crystals in it (same color as the walls).
Photo Sharing and Video Hosting at Photobucket
We also have flooring. Should have done that first. Post about the flooring (which isn't done yet) soon. Hindsight is so 20/20!

Tuesday, November 13, 2007

New Drip Bowls!

Our lovely black and almond Amana stove just got a facelift! The old stainless steel drip bowls were very nasty and stained from years of abuse. I went to Home Depot and found BLACK drip bowls that look ever so nice with the black front and black control unit on the oven. I am going to scrub and freecycle the old ones. Sometimes it's the most simple things that make me happy!
Cost: $16
Waste: 4 Nasty drip bowls, hopefully recycled in some way

Monday, November 12, 2007

Our Limestone Patio- 200 hours of work!

Before:
Photo Sharing and Video Hosting at Photobucket
The front part of our backyard, with two apple trees, an old picnic table, and a large quantity of gravel and wood chips. Oh, and 12 bottle caps, a rusty spring, a door hinge, a bunch of broken glass, including the bottom of a beer bottle, and more!

During
Photo Sharing and Video Hosting at Photobucket
What a great workbench that picnic table makes! It is serving as jack-of-all-trades in our house remodel. Notice the wonderful "gate" into our backyard, too... the vinyl lattice we wired up!

After:
Photo Sharing and Video Hosting at Photobucket

How we did it:
We are very lucky to have access to a large scrap pile of stone, from which we can pick whatever we want and have it delivered for the price of a case of Negra Modelo or Bass Ale. My father-in-law runs and owns an architectural stone cutting shop. He works on multi-million dollar houses. We get the rejects, overages, and off falls!

The patio is made out of Cottonwood limestone. It is all from the waste pile, where it was headed to be ground into aggregate. It is approximately 3 to 4 inches thick, and sitting on a bed of about 3 inches of sand. It is framed in with recycled railroad ties that are dug into the ground and anchored below the frost line with 3 foot rebar. We used a circular saw with a diamond blade to dry cut the limestone, and used a belt sander with garnet sandpaper to finish the stone.

We went through a LOT of sandpaper, and a LOT of beer. A long, HOT project!

Where the materials are from:
Railroad ties- Freecycle
Limestone, Diamond Blades- Father-in-law's shop and waste pile
Sand, Sandpaper, Rebar- Home Depot

What we spent:

$20 for a case of beer for my dear father-in-law
$200 for sand and rebar
$10 or so for gas to haul the railroad ties
$40 in sandpaper
___________
$270 total cost for patio!


Saturday, November 10, 2007

Ways to "Go Green"

I was flipping through the October 2007 issue of This Old House. The "theme" of the issue was green remodeling ideas, and I thought great! This will be so useful, as I am trying to make as little of an environmental impact as possible on my house.

Unfortunately, most of the magazine was dedicated to expensive ways to save energy by buying new, and new products that are theoretically manufactured using "green" techniques. I am much more interested in information about how to retrofit existing houses with a much smaller consumer footprint, and information on how to use old materials.

Now, before I completely trash the magazine issue, there was a nice article on 22 Little Ways to Go Green, with a number of somewhat useful ideas. We already do most of them, however... no shoes in the house for instance. But, the list is a nice reminder of some of the more basic ways to improve your energy efficiency.

Friday, November 9, 2007

Alternatives to Removal?

As I mentioned below, I have popcorn ceilings throughout my home. Below I discussed testing the material in order to possibly remove it. However, removing the popcorn ceiling would add to the landfill, as it is non-recyclable and unable to be reused.

What are some possible alternatives to removing the popcorn that will still give me a nice ceiling?
  • Install a new drywall ceiling below the original ceiling.
  • Install a beadboard ceiling.
  • Install a tin or aluminum ceiling tile system.
All of these materials could be either salvaged or bought from a job overage AND there would be no waste to dispose of.

Asbestos and Popcorn Ceilings

There are popcorn ceilings throughout the entire house. Popcorn ceiling manufactured prior to 1978 likely contains asbestos.

I HATE the popcorn ceiling. It would be pretty easy to remove myself IF it doesn't contain asbestos. But, if it contains asbestos, I'm leaving it up there because the removal is hard and costly, even if you do it yourself.

I can have samples of the material tested for asbestos. It will cost me $100 to $200. And, if I find there is asbestos, I am legally required to disclose this fact when we sell the house.

Do I test or not? I can't afford to have the asbestos removed if it is there, so it will stay, and the disclosure will likely decrease my resale value. But if it isn't asbestos, I can remove the ugly popcorn ceilings and increase both my enjoyment of the house and it's resale value.

Thursday, November 8, 2007

Deconstruction: Reusing Building Materials (and Keeping Them OUT of the Landfill)

From the ReSource website:
Deconstruction involves carefully dismantling a building and salvaging the parts that can be re-used. Material coming from deconstruction often includes, but is not limited to, lumber, doors, windows, cabinetry and hardwood flooring. By choosing deconstruction, homeowners and builders can save precious natural resources and help divert material from the landfill.
Since we are renovating an older house, it is particularly easy to find a suitable salvaged replacement from a "scrape" or remodel. Our original front door from 1911 may be rotted and cracked, but a similar door may be in excellent shape and need only a coat of paint.

Where to Look:
ReSource (Boulder and Fort Collins, CO)
Habitat for Humanity ReStores (Nationwide)
Freecycle (Nationwide)
Craigslist (Nationwide)
The ReUse People of America (CO, WA, CA)

Tuesday, November 6, 2007

What will we do?

Install new kitchen cabinets and counters.
Re-floor the entire house.
Raise the front porch and install new porch columns.
Convert the un-used back room into a master bedroom and laundry room.
Install built in bookshelves and cabinets throughout the house for greater storage.
Fence the backyard, possibly with privacy fencing.
Create a nice back yard for relaxing using xeriscaping techniques.
Increase the energy efficiency of the house.
Repair/Replace the old windows.
Install a new front door.
Replace all of the hollow core doors with solid wood doors.

Our Tiny Old House


About this house:
Built in 1911
897 square feet
2 Bedrooms
1 Bathroom


The Good:

  • This is an old house.
  • The bones of this house are solid. In fact, the inspector commented about its good shape.
  • There are 17 trees on this property.
The Bad:
  • The entire house is a glorious shade of white.
  • There are popcorn ceilings, which likely contain asbestos.
  • There are only two bedrooms.
  • There is no fenced yard.
  • The kitchen cabinets are small, very high, and very few in number.
  • The front porch is sagging, and the porch columns are rotting at the base.
  • The upper (white) siding is asbestos cement siding, and the lower (tan) siding is aluminum.

Thursday, November 1, 2007

Privacy Policy

This privacy policy describes how this website treats personal information that may be collected when you visit our website or request information. If you do not agree with this privacy policy, please do not use this site.

1. Privacy Commitment
We are committed to the privacy of our website visitors. You may use the site without disclosing personally identifiable information, and we will not obtain such information about you unless you choose to submit it to us.

2. Third Parties and Affiliates
This website is affiliated with third party entities with whom we have business relationships or who provide services associated with the operation of this site. We may disclose and share any information collected or submitted to this site with those parties or a subsidiary, third-party contractor or affiliate of those parties. As a member of the Houseblogs Ad Network, this website adheres to the HiP Media, LLC privacy policy.

3. Cookies and Log Files
Please note that this website and affiliates of this website may use “cookies,” which are small files stored on your computer’s hard drive that are used to track certain information. The use of “cookies” does not reveal any personal information about the person viewing the page (such as a username or password) unless the person has previously given such information. If you find cookies objectionable, please consult your browser’s documentation for information on how to block or erase cookies. In addition, our server collects and saves the default information customarily logged by server software. These logs may be kept for an indefinite length of time and used at any time and in any way necessary to prevent security breaches, protect the integrity of the data or improve the use experience of this website.

4. Personal Information
In order to respond to your questions or fulfill your requests, it may be necessary to ask for personal information such as your name, address, e-mail address and telephone number. We may use this information to contact you to respond to your request. We will not provide this information to a third party without your permission, except upon the request of state or federal authorities or as otherwise required by law.

If you would like to review, update, or delete information you have previously provided to us, please e-mail us. We will make reasonable efforts to comply with your request.

5. Changes
We may change or modify the content of these pages or withdraw access to this site at any time without notice. If we decide to change our privacy policy, we will post those changes to this privacy statement so that users are always aware of what information we collect, how we use it and under what circumstances we disclose it. Changes to the privacy policy will be dated and will be effective from the date specified forward. You should check our Privacy Policy each time you visit our site to identify and understand any changes made since your previous visit.