Friday, October 31, 2008

Darn! More Frugality and Trash Prevention

I've learned a new skill this week- darning socks! It's been on my list of things to learn, and a drawer full of holey socks coupled with the price of new ones and my desire to keep things from becoming trash forced my hand.

To darn a sock, you need a darning needle, a darning egg or other smooth round object, and darning cotton or embroidery thread. I was pleasantly surprised to discover that my grandmother's sewing kit included 4 balls of darning cotton. It's apparently not made anymore. I found this ceramic egg at the Habitat ReStore for $.50.

Photobucket

I've been carting a bag of socks around with me all week, darning when I have 1o minutes to wait here or there. It goes quite quickly once you get the hang of it. Here is a video on how to darn socks. It shows darning wool socks with wool, but the technique is the same for cotton and silk socks. Just use a matching thread, and a needle about as big as your threads.

Anyone else darn their socks?

Thursday, October 23, 2008

I WAS RIGHT! GRRRRRR!

It IS portland cement mortar. I just couldn't shake the feeling that the mortar "tinkled" when it dropped, that it looked smooth like modern mortar. I looked up the mortar he used: Quickrete Type S Mortar Mix. It's 3-1/2 to 4-1/2 parts masonry sand, 1/2 part hydrated lime, 1 part Portland cement (by volume). GRRRRRR!!

Now, it doesn't say portland cement anywhere on the bag... I had to do some internet sleuthing to figure out it was the wrong mortar.

I am BEYOND frustrated. BEYOND. Either the mason LIED to my face, OR he doesn't know what he's talking about.

I'm never hiring out work again.

The Right Mortar and Brick Patches

I was wrong! I'll always admit when I am wrong, and wrong I am. I'm VERY happy that I am wrong this morning.

The new mortar is NOT cement based mortar. It IS a premixed lime and sand mortar, so it does look slightly different. It SHOULD cure to the same color... funny how 1 day of curing in 100 degree weather ages it faster than 3 days of 40 and 50 degree weather. Our mason was very nice and walked me through their whole process again.

I wanted to show off the brick patches he's done on the house. Remember all of the nail holes?

Photobucket

We tried many different patches, and settled on a patch made by mixing the mortar with brick dust, patching, and dusting the patch with brick dust. There are two patches in the picture below:

Photobucket

I'm quite happy with them. From more than 2 feet away, you can't see them at all, and from the street it looks like a different house!

Wednesday, October 22, 2008

The WRONG Mortar?

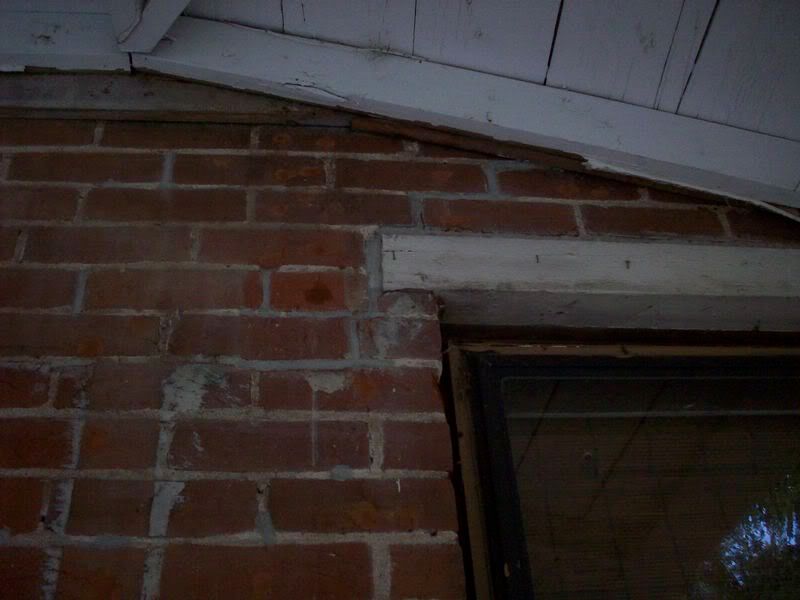
A few weeks ago we realized that there was NO way we were going to get the house sealed up for winter unless we found the money to fix the bricks around the window so that we could seal up these holes:
Photobucket

A few weeks ago, I called the mason whom we started the work with (and who did a FABULOUS job on the first part!). Luckily, he was able to work us in this week.

They restarted yesterday. Yesterday I came home and thought something was a "bit off" about the mortar. It didn't look quite right... it seemed way too grey and smooth. It was dark out, and the mortar was still wet, so I decided to give a better look at it in daylight:

Photobucket
Photobucket

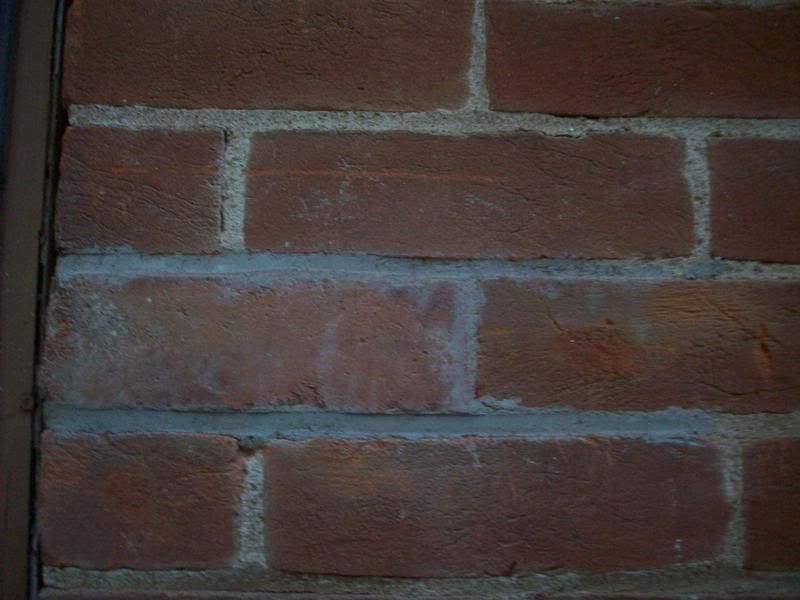
It looks like cement based mortar. A piece of it dropped on the ground "tinkles" like cement based mortar. And, there is an empty bag of cement based mortar in the pile of things they left overnight.

I'm just sick! Not only does it look like crap up close... it will DESTROY my bricks in the long term. What kills me is that he asked me if the mortar he used last time was looking the way we wanted it! I showed him the pile of sand they used last time, and he said they would use new sand. The owner hasn't personally worked on our house... but it's the same man working on it now that worked on it in July.

I have a call into him, but don't expect to hear back until tomorrow. I don't even know what to do. I HATE confrontation, but I can't let them leave the cement mortar up there. I also can't afford to pay more to fix their mistake. I feel bad... it's two full days of labor wasted, but I need to have it taken care of. Any words of advice?

One last thing... I am NEVER hiring out ANYTHING that I care about how it's done ever again!

Sunday, October 19, 2008

Stripping Paint in the Afternoon...

We worked a bit more on the new front door today. I'd like to have it done this week, as our current front door is cracked, and in need of serious weatherstripping to make it through this next winter. You can see daylight around the edges on almost all sides. Instead of spending time with the old one, I'd rather install the new (old) one!

We worked on the exterior side today... the side with the weird paint/chalk. We used a citrus based stripper (covered with saran wrap to keep it moist) to strip the top layers of paint off of the mouldings and around the lites.

Photobucket

The ash tree above our "workbench" (old picnic table) decided to add some leaves for visual interest.

After we scraped the paint off with various dental tools, the head of a large nail, and a brass stripping brush, we cleaned it with mineral spirits. No picture, because it looks exactly the same in a picture; the stripper had seemingly no or little effect on the chalky bottom paint. My hunch is that it is a plaster or drywall compound spread on to smooth defects and ensure a "perfect" paint job.

That's what we did to seal up our house this weekend. It's round about and not immediate, but it should help out in the long run.

Saturday, October 18, 2008

Houseblogs.net is back up!

I'm a big nerd, but I'm very excited that houseblogs.net is back up. I hadn't realized how many blogs I read only through their service until they went down. Now I can completely fulfill my house addiction!

Monday, October 13, 2008

Finishing Our New Window- Inside

I've been working on the new window in my study. First, I needed to add wood to extend the window frame to the drywall. Theoretically, this involves a table saw to rip trim down to the exact dimensions of the gap. We don't own a table saw. Luckily, my local big box hardware store carries 1/2"x 3/4" trim... just perfect for what I needed to do.

Here's the window with it's new frame extensions... they are the unpainted wood:
Photobucket
And, a close up:
Photobucket

I attached the wood strips with finishing nails flush with the drywall. Well, I TRIED to install the wood strips flush with the drywall:
Photobucket

Unfortunately, the drywall bows out considerably in both lower corners. The window is plumb and level, and 80% of the drywall is right where it should be. These corners are about 1/2" off. Any suggestions for how to install the window trim so it looks right? I'm thinking I might have to cut out the offending drywall, level behind it, and replace.


After I added the frame extensions, I went over the nailing fins with drywall compound to bring those areas flush with the drywall. When we installed the new construction window, we decided to use the nailing fins and simply cut out chunks of drywall, as the holes and patches would eventually be covered by window trim:
Photobucket

Here's the window as it looks now... after the drywall compound dries I'll caulk around the window again and call it done!
Photobucket

Saturday, October 11, 2008

More Finds- The Casper, WY, Edition

While I was in Casper, Wyoming, last week, I stopped by the Habitat ReStore. I picked up a few things:

Photobucket
Two sets of these windows/cabinet doors, with hinges and glass knobs. One of the doors is missing a pane of glass. I think one set will be perfect for creating a built in cabinet out of a window we are taking out between the two bedrooms. I'm not sure what to use the other set for, but at $20 for all four, I couldn't resist.

I also found these copper outdoor lights:
Photobucket
They will look cute outside our back doors. I'll have to keep my eyes out for the right covers.

A few weeks ago I picked up 100 sf of maple flooring for $10:
Photobucket
It's from an old gym floor. If the original floors in either of the studies turn out to be unusable, I can put this down instead! They are both smaller than 100 sf.

Has anyone noticed I seem to be buying 1940's and 50's things for my 1911 house? Someone slap me! It's hard when there is NOTHING left to go on in the house as far as style and you try to buy everything used. Ah, well.

Friday, October 10, 2008

Homemade Birthday Presents and Decorating with Photos

My husband's birthday was yesterday. Happy Birthday! I'm so glad you were born!

For his present this year, I decided to go home made and thoughtful. I framed two pictures of our puppies that he has always loved; the first is titled "Disappearing Dog" and was taken by his aunt. (The other one, of the white dog in the wind was taken by me). I found the perfect frames at Goodwill, and used my home inkjet printer to print them on photo paper.

Photobucket

Photobucket

It's amazing how putting art from and about the people and things you love can really warm up a room!