Monday, December 28, 2009

The Ursuline Centre

While visiting family, we toured the Ursuline Centre in Great Falls, Montana. It was opened in 1912 as school run by the Ursuline Sisters. There are a few pictures on their website; here are a few more:
Photobucket
Photobucket
Photobucket
Alabaster light (bought from a traveling salesman!)
Photobucket
Photobucket
Stained glass windows in the chapel
Photobucket
The art studio

Saturday, December 26, 2009

Gingerbread Architecture

This post is all about gingerbread and houses. It is NOT, however, about the kind on MY house!
We made gingerbread houses for Christmas:
Photobucket
Here is my gingerbread house... big suprise! It's a classic quasi-Victorian cottage!
Photobucket
Other houses included the avante garde with lots of trees and a really cool fence...
Photobucket
... cottages with gardens and dog houses...
Photobucket
... and flowers and a basketball hoop.
Photobucket

Friday, December 18, 2009

Just a Note on the Two Ads At the Top...

They are not paid ads; they are for family members' businesses that are sort of related to old houses and home improvement/decoration. Just wanted to clarify, as I've received a few comments asking for paid listings. At this time, Tiny Old House is not accepting paid advertising. Thanks!

Saturday, December 5, 2009

The New Old Front Door

Here's the new old front door.
Photobucket

It has a very pretty dentil style molding under the beveled glass window, and matches our house age perfectly... it's almost identical to the one on the version of our house a block away.

The finish is cracking in places, and there is quite a bit of dirt on the door; luckily, it is shellacked and a simple wipe with denatured alcohol and a nylon scrubby removes the dirty cracking finish while leaving all of the aged character.

Photobucket

The door is not perfect; at one point in it's history, a standard lockset hole was drilled into the side opposite the original mortise lock. We'll be using the original holes, and plugging the circular hole. Hopefully, with stain, shellac, and the careful used of artist paints and brushes, we'll be able to hide the patch!

Monday, November 30, 2009

Woohoo!

We're a $300 gift certificate richer, thanks to Houseblogs.net. Very excited about this! It will be nice to have the money to buy new materials for a project for once... and not have to search for them used (though, I do enjoy that immensely most of the time!)...
... or maybe I should just buy a few more router bits for the router I got for my birthday! What a birthday present.

Monday, November 23, 2009

Welcome Back?

Some flu, some bronchitis... coughing, bruised ribs, fevers ... that's how our two months have been. It amazes me that I still woke myself up coughing last night, two months after coughing for the first time. I will say that Delsym is a miracle cough syrup, that tomato soup and saltines is the only palatable thing at many points, and that my husband and I are very lucky to have each other to take care of us!

Needless to say, not much has happened on the house. There is a door leaning against the water heater closet waiting to be installed and a new router and table received as a birthday present waiting to be used for the first time. The new old front door is still waiting half stripped in the garage. Even the backyard was left in a state of half completion... leaves need raked and composted, weeds mowed, tools put away.

I'll raise a glass of orange juice to continued improving health... and to getting back to our Tiny Old House!

After we got the keys to our house...

the first thing we did was move the washer and dryer from the kitchen. (Yes, I'm entering the contest that Houseblogs.net is offering! I could sure use that $300 gift certificate from True Value!) I've never been a big fan of spaghetti sauce near my clean clothes, and so the weekend after we moved in we moved the washer/dyer hookups from the east side of the kitchen to the back room. Moving the water hook-ups was relatively easy, as the back room shares the wet wall with the sink/dishwasher from the kitchen; moving the 220 electrical line for the dryer was a trickier reroute and fish from the attic. Luckily, we had help from family with the project!

Here's the new laundry center (with a pretty puppy in the middle of her shave down on top):
Photobucket
Here is where the laundry center used to be...
Photobucket
The fridge used to be where the nice hutch is in the second picture. The rest of the kitchen counterspace and appliances are off to the left. We think that THIS is a much better use of space!
Photobucket
And, of course, the rest of the kitchen; you can see that stained glass window in the laundry picture, too:
Photobucket
The laundry room is through the door on the right (with the white gate); the current fridge/pantry is to the right.

This post was written for Houseblogs.net as part of a sweepstakes sponsored by True Value.

Tuesday, August 18, 2009

Door Finishing Fun

When we left the new water heater closet door last, it was freshly stained and ready for finish and hardware.

Step One: Cut a hole for the vent
Every gas water heater needs air and venting, so we need to add a vent to this door. The small panel on this door (originally the top panel) is perfect for this job! I carefully measured the inside of the vent, traced it onto the door, and drilled a 3/8 inch hole in each corner:
Photobucket
This allows me to use a jigsaw to remove the panel.
Photobucket

Step OnePointFive: Paint the Vent
Our vent is a salvaged vent from the Habitat ReStore. $1, but in need of some paint. I scuffed it up with sandpaper, and then spraypainted it glossy black, making sure to coat both sides of the vent louvers:
Photobucket
Photobucket

Step Two: Apply Finish
We chose shellac for our door finish; Zinsser Bullseye Shellac to be specific. I'm rather enamoured with the idea of shellac right now... and am especially loving the ease with which it is coming off of an older door that needs refinished. I figured that this door (like our entire bathroom) is a great place for an experiment.
I brushed a thin coat of shellac onto the door, let dry an hour, and sanded lightly with 220 grit sandpaper; I repeated this 3 times. The 220 was a bit coarse for my prefered final finish, so I am planning on a final sanding with 400 grit sandpaper; we'll see today how that goes.

Here's a picture of the door with a third unsanded coat of shellac and with the grate set in place:
Photobucket
Photobucket

Coming up: More Door Jamb Fun!

Monday, August 17, 2009

Back to the House

Did you wonder if this would ever turn back into a houseblog? Well, today is the day! I spent the weekend sanding and staining a new door for the water heater closet in the bathroom:
Photobucket
This doorway is 22" wide, an unusual size. Complicating matters was my want for a paneled door, and my preponsity for used doors. It is hard to cut 2 inches off of a used 24" door that has panels and door handles cut!

After years of searching, I finally found a 22" door at our local salvage store. It is newish, pine construction, and three panels. The smallest panel is just perfect for installing a vent; we are "flipping" the door over so that this panel will be on the bottom.

Here is the sanding:
Photobucket
I sanded first with 100 grit sandpaper on my orbital sander. The polyurethane finish gummed up the sandpaper quite fast; I was able to "pick" it off and keep going at intervals. After removing all finish, I finished up with 150 and 180 grit sandpaper. I wanted a dark stain, so stopped at 180.

I used the same stain on the door as I had used on the bathroom baseboard; Miniwax Red Mahogany:
Photobucket
This picture is of the first coat drying. I've since added one more coat, and will hopefully add the finish today after finding a vent to add.

Thursday, August 13, 2009

Dishes for the Cardinal

We perused the thrift stores carefully for just the right dishware for the Cardinal... and here it is!
Photobucket
Photobucket

They match the orange appliances beautifully:
Photobucket

Wednesday, August 12, 2009

Call for Help

I don't normally ask for help on this blog, but this seems important. I've been reading Hallie and Joe's blog for over a year, and now they've hit a rough spot. A much rougher spot than a truck broken down in Montana. Here is a new website on how to help!

Glacier Pics

Here's a few pictures from our trip to Glacier:
Photobucket
Goose Island in St. Mary's Lake
Photobucket
Hidden Lake
Photobucket
Running Eagle Falls

Photobucket

Canoeing on Two Medicine Lake

AND...
Scary clouds on the way home in Wyoming!
Photobucket
Photobucket

Tuesday, August 11, 2009

Busted Flat in Shelby

We had a lovely trip to Montana and Glacier National Park last week. We took the Cardinal up, using our old Dodge Dakota to tow it. We didn't want to take the Subaru on such a long trip without trailer brakes! Sure the Dakota has 180,000 miles on it... but the Subie had 150K. And the Dakota had never run better.

The trip to Glacier went well; we enjoyed family, hiking, and wildlife for a few days before heading back to Great Falls. Unfortunately, about 78 miles (exactly) from East Glacier, the truck acquired a terrific vibration. We were just about to stop, when there was a huge "pop" and the truck lost all power to the wheels. The vibration was quite jarring! We just barely pulled the truck and trailer onto the shoulder... and after looking at the underside of our truck, the huge trail of liquid down the interstate, the lake of fluid under the truck, AND the cracked transfer case, we cried.

Wish we had pictures.

Called a tow truck... luckily my sister had AAA. Unluckily, we were still 60 miles from Great Falls, with only small towns between. I called mechanics in each town, and none could get us in within a week. We didn't know what would happen. Oh, and AAA doesn't cover trailer towing. Would we have to leave the Cardinal by the interstate?

After two hours, the tow truck arrived. Luckily, the driver was more than willing to hook the trailer onto the back for $1 a mile... and would tow us free 20 miles north to his town. He made a few calls, and found a mechanic who could get us in the next day.

He asked us where we wanted to have the trailer parked; we said "Cheap and close to the mechanic". He thought about it... and said he had a free place for us if we could handle train noise. Well... living in an old house in the old part of town, I have no problem with train noise.

Here was our two night camp spot:
Photobucket
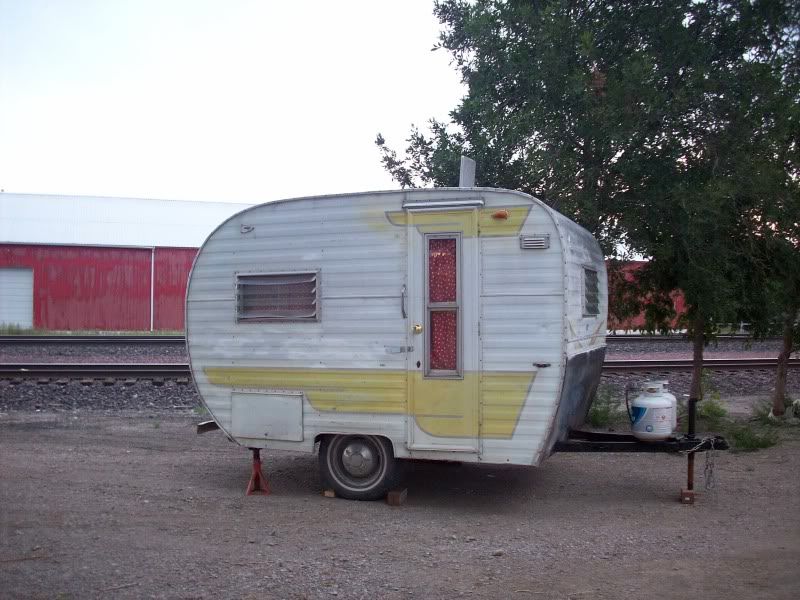
Right by the tracks.

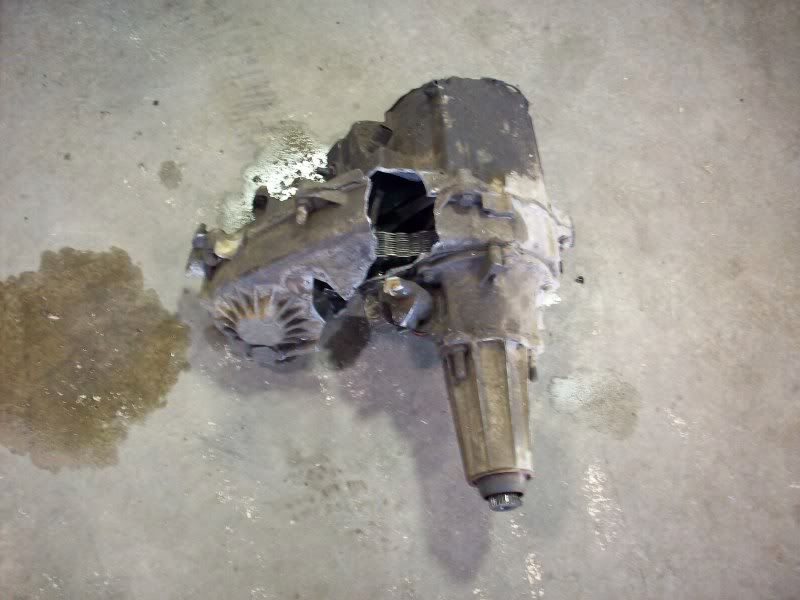
Back to the mechanic... I must say that everyone who stuck their head under our truck, from the tow driver, to the 4 mechanics let out a huge breath and shook their head. Our transfer case didn't just crack... it EXPLODED:
Photobucket

The part was supposed to be in the next day, and he promised it by 5. At five the next day, however, we walk to the shop to a somewhat flustered mechanic. Our part had missed the truck up, but the mechanic had sent a man down to get it in the hopes of staying late to finish it up. Unfortunately, the man's truck had broken down on the side of the road!

Ah well. It was done the next day, albeit without a speedometer (the wires ripped out in the explosion) and missing 4x4 (apparently, the CV joint on the front wheels was freezing up now), and we are back down in Colorado, considerably lighter on the pocketbook.

Oh, and if you EVER have a chance to stay in Shelby, MT, may I recommend the local museum... the Marias Museum? It was a big house FULL of old things, from Victrolas and wedding gowns, to depression glass, pistols, and blacksmith gear. It was one of the most interesting museums I've ever been in!

Thursday, July 23, 2009

Registering the Cardinal, or RED TAPE EVERYWHERE!

A few weeks ago, we decided that the Cardinal really needed its own set of Colorado license plates, so we took a trip to the DMV. First, they sent us for a VIN verification with 3 day temporary tags. We got to the dealer, who couldn't find a VIN anywhere... and decided that since the tongue had obviously been replaced and a larger one fishplated on that the previous VIN had been cut off in the switch. He told us to go to the state patrol.

We get to the state patrol, only to find out that they do VIN verifications ONLY every other Thursday... and the next one was in 11 days. (8 days past our temp tags, and a brand new NON WAIVABLE late fee of $25 imposed by the great state of Colorado as a money making scheme in effect. Seriously... they even called it that when they voted it in). We make the appointment.

We get to the state patrol. SP looks at the trailer and says "Yep... the VIN should be right there, but they cut it off. Any sign of manufacturer on there?".

Now... it's pretty obvious it's a Cardinal IF you've done the research on vintage Cardinal logos... our trailer has a most of a very faded bird with the words Deluxe, Adams, and Del Monte, Calif. on it in the exact position it should be. But... the word Cardinal is faded off... and our SP officer is not a vintage trailer researcher. He poked around in all the cabinets, saying "ones just a little newer than this have manufacturer info inside a door." LUCKILY he decided to write on the form that he saw the manufacturer's name on there (that would have been 10 more forms and hassle, I'm SURE!).

He wrote it all up, found 2 more forms for us to fill out, told us to get it weighed and certified, and sent us on his way. He really did a great job of making sure all of the i's were dotted and the t's were crossed... he say "I hope I don't offend, but the folks over at the DMV can be VERY anal. Let's try to get this perfect".

Took it into the DMV the next day... and after filling out 3 more forms, we had a new little tin plate and CO VIN number to rivet to the trailer. We were pretty excited... until the phone rang on Monday.
Turns out, there's ANOTHER form to fill out AND we needed a professional appraisal done by an RV dealer printed on company letter head. Not too hard, right?

After calling every single dealer in the entire Northern Colorado area (including no less than 5 cities, and numerous towns)... and having started in on North Denver... I still hadn't found anyone willing or able to do an appraisal. I called no less than TWENTY FIVE dealers, with negatives all around. Every one said "Not in the blue book, so we can't do it" or "We don't do appraisals."

Then, I remembered that the SECOND dealer I called on Friday had just taken my name and number for a call back from the sales manager. I hadn't received a call back, and at the time, I just assumed that they couldn't do it just like everyone else and were just not taking the time to tell me "no".

I called them and was overjoyed to hear them say they would do it the next afternoon... and she apologized for not getting back with me (she recognized the request... I didn't say a thing)! I just got back from the appraisal AND from the DMV. The VERY nice woman at the DMV spent 10 minutes making every single i was dotted and t was crossed, and sent it in to the state!
I'll be checking the mail in 2 to 4 weeks for that title!

By the way... the RV dealer I got the appraisal from had a cute little 1958 Fleetwood 10 foot trailer they had on the "back lot" ... said it needed a lot of work by a willing pair of hands. It didn't LOOK much worse than ours from the outside. I was tempted... but decided not to go look. They said they sell things like that to a man in Cheyenne for trailer beds for $200 or so... maybe I should go back
...


Wednesday, July 22, 2009

Well, a Few of You Warned Me...

... but it was too late. I'm sidelined temporarily by what is likely quadriceps tendonitis, an over-use injury of the tendon right above the patella.

I have NO idea what caused it... no REALLY.
Photobucket
Ok... maybe moving a ton or two of rocks by myself could cause an overuse injury. Think so?

I've been icing for the past few days, and generally keeping off of it. It's starting to feel normal! I'm hoping that by tomorrow I might be able to do some light, NON-knee bending activities.

Saturday, July 18, 2009

Edging Done...

... for the gravel path surrounding the raised garden beds.

First, I dug a narrow trench; I marked guide "holes" at the end and the middle, and then set to work:
Photobucket
After digging the trench, I carried the stones back over (you may remember that this is where they WERE before I moved them across the yard... back again) and laid them out:
Photobucket
I was careful to choose only stones with a relatively flat edge, as I hope to have the edge flush with the grass for easy mowing.

I chose NOT to use landscaping fabric for two reasons (actually... three):
1) It's made of plastic, and I don't want to add more. (Please ignore the landscaping fabric in the fire circle... it was installed 2 years ago).
2) It isn't fool proof; see fire pit from two years ago.
3) It's expensive.

I'll line under the gravel with heavy sheets of newspaper; the edging stones will just have to accept grass growing between them.
Photobucket
Here is the finished edge; now I need to remove about an inch of soil between the edge and the beds to make room for two inches of gravel.

We are trying to decide between straight 3/8 inch crushed rock, and between the 3/8 minus (or breeze) rock that creates more of a hard packed path. Also trying to decide on color... I'm thinking grey would be nice. Not buttery yellow... but maybe rose/red. It's the cheapest. Seems funny to be buying rocks... especially since I see craigslist adds of people giving away landscaping rocks all the time. It's usually the 3/4 to 1 1/2 inch rocks, though... the kind that don't make a nice path... or pea gravel, which I am not a big fan of.

Thursday, July 16, 2009

Filling in the Garden Path

We have been hard at work in the yard; one of our tasks is filling in the garden path surrounding the fire pit. We decided to do a path of flat stone in random shapes and sizes. This involves a sledgehammer, a hammer, and a stone chisel.

Or, if you don't have a stone chisel... a hammer turned around!
Photobucket
Here, we are beveling the edges slightly in a random pattern, so that the stones aren't too sharp on top and so they look more "natural". This is a great way to chip off a larger portion of stone so as to make a better fit in the walkway.

We are filling in between the flat stones with homemade gravel. Much of the gravel comes from the beveling and shaping process; the rest is coming from a few chunks of limestone that have no other purpose in our yard. The sledgehammer is INDISPENSABLE in gravel making!
Photobucket

Photobucket

Photobucket

We are about two thirds of the way done with the path, but have run out of flat stone. Our "supplier" is gathering another pallet or so for us to use... no finishing until then!

Wednesday, July 15, 2009

More Stone Beds

Three more stone garden beds, in a neat row (you can see the EVIL bush poking up over the fence- what IS it?):
Photobucket

The dogs knocked over a stone on the last one by playing body-slam tag into the wall right before I took the picture; I hadn't filled the cracks with stones chips yet. Funny pups never even blinked! I'll assume that the stone wasn't a good match for that spot, and replace it with another. The beds are generally steady and firm; filling with dirt/compost/manure will help their stability as well. I wouldn't recommend stacking these stones THREE deep in a single stone wide wall.

Each bed is approximately 4 feet wide, and 8 feet long, with a 2 foot path between each and along the fence. I ran out of newspaper, and so only covered the edges of the beds; I will fill in with massive quantities of newspaper later to smoother the grass poking up in the middle of each. One more bed to go!

Tuesday, July 14, 2009

Any Idea What THIS Evil Plant Is?

This plant/bush/vine has been terrorizing me for 5 years. It seemed innocuous enough when we moved in, just a nice bush with small pinky purple flowers drifting over the neighbor's fence. Then, it started to take over the yard.

You can see a bit of it coming over the neighbor's fence in yesterday's pictures... and here's a few old ones of it at it's finest:
Photobucket
(complete with garter snake and small purple flower)
Photobucket
(complete with fuzzy puppy who is stalking the garter snake).

The growth you can see appears to be second year growth... the first year's growth appears to be non-woody and have much larger leaves. The bush has runner type roots. I can pull or dig a plant up as far as I can, but I won't have gotten it all. A few weeks ago, I went all out and clipped EVERY bushlet in my yard down and painted each remained stumplet with stump killer. Last week, those stumplets were covered in new green growth.

Save me from the bush!

What is this plant?

Monday, July 13, 2009

Raised Beds of Stone

I was inspired at some point by Paul at Homeowner's Blog to build some raised gardens out of stone. We have piles of rubble stone at our disposal, and when I saw this picture I knew what I was going to do!

Here is the first bed. First, I laid down several thicknesses of newspaper as an immediate weed barrier underneath the rocks.
Photobucket

Then, I created a dry stacked wall, two stones high. The garden bed is about 4 feet wide and 8 feet long.

Photobucket

I filled in the gaps between stones with chipped stone. There will be four more of these along the fence, and then they will be surrounded by a layer of rock chips/pea gravel, as per this garden plan (there will be FIVE gardens along the east fence, not three):
Photobucket

I plan on lasagna gardening these beds by layering a bunch more newspaper at the bottom, a bunch of manure/compost, and then wood chips at the top. Four more to build before I take the truck to find manure!