Showing posts with label Energy Efficiency. Show all posts

Friday, March 13, 2009

Now THIS Would Have Stopped Those Drafts...

... this winter!

funny pictures of cats with captions
see more Lolcats and funny pictures

Friday, February 13, 2009

Look at ALL this Caulk!

Photobucket

Looks pretty bad, doesn't it! It's just oozing out. Lucky for us, it is supposed to look like this. The caulk is temporary, removable caulk, made to last one season, and just perfect for our needs this year. It is sealing up the holes between the old storm windows and the new window trim; this summer, we will pull off the storm windows and permanently weatherproof the windows and storms. Until then, this caulk is giving us quite a bit of savings... the house felt MUCH warmer after we installed it. Amazing what sealing off a few drafts will do!

Tuesday, December 16, 2008

BRRRR! (And Our Programmable Thermostat)

It is SO COLD here! BRRRRR! In honor of the cold, I'm reposting a very old post (that nobody probably saw before!). I've seen some discussion over whether lowering your heat really helps save money... these numbers prove it does (on a forced air heating system, at least).

One of the first things we did to our house was install a programmable thermostat. We chose this Honeywell 5-2 Day Programmable Thermostat. $30 later...

This is what we set the thermostat to:
Year 1: 62º (No programmable thermostat)
Year 2: 62º During the Day, 54º at Night and While Gone

Table 1, Monthly Therm Usage

Year 1, Year 2
October: 47 Therms, 30 Therms
November: 24 Therms, 19 Therms
December: 96 Therms, 75 Therms
January: 113 Therms, 63 Therms
February: 69 Therms, 71 Therms
March: 72 Therms, 50 Therms

Average: 70.16, 51.33
Total: 421 Therms, 308 Therms

Table 2, Monthly Outside Temperature

Year 1, Year 2
October: 53º, 56º
November: 44º, 46º
December: 32º, 29º
January: 29º, 38º
February: 37º, 29º
March: 39º, 36º

Average: 39º, 39º

We saved 19 therms a month, simply by installing a programmable thermostat! Installing the thermostat took about 20 minutes of our lives. WELL worth it! We have definitely saved our $30 many times over. Now that we have made the house more efficient in other ways, I'm looking for even more savings this year!


Thursday, December 4, 2008

Door Swap

We realized last winter that our back door was a hollow core door masquerading as a back door. Not good for heat loss or efficiency! I took a trip to the Habitat ReStore and bought the cheapest solid door I could find as a replacement, as we intend on removing the doorway in the remodel (if it ever gets done).

Photobucket

It's not a bad little door... $30, and solid wood. Looks a lot better than the flat paneled hollow core door!

To match the hinges up, I stacked the doors on my "workbench" (picnic table). This allowed me to match the positioning exactly.
Photobucket
I reused the existing hinges, though they may not be beefy enough for this door (which is very heavy). The door is installed... and it does feel a little warmer in the laundry room now.

Sunday, September 28, 2008

Stop The Leaks! Last Week for September

How did everyone do this week? It's getting colder here at night... a nice push to getting things sealed up.

This past week, we worked on plugging the huge hole in our house with a window; while the new, bigger window will likely leak more heat than the former sided wall, once we removed the siding there was no going back. We wedged foam backing around the entire window on both the inside and outside to reduce drafts, and caulked very well on the inside.

Our brick repair around the outside windows won't be finished for a couple weeks, so I'm going to concentrate on our new front door this week. Once the brick is done, it will be a mad dash to seal up the outside of the windows before the snow flies.

I'm going to continue "Stopping the Leaks" at my house in October... I'll leave the banner up (and if I get around to it, change the month), and leave everyone up who wants to continue in October. Feel free to add yourself!


Tuesday, September 23, 2008

Dealing With Windows- The Energy Efficiency Edition

The windows on our house are in need of SOMETHING to make them more energy efficient. But what? There are so many options...

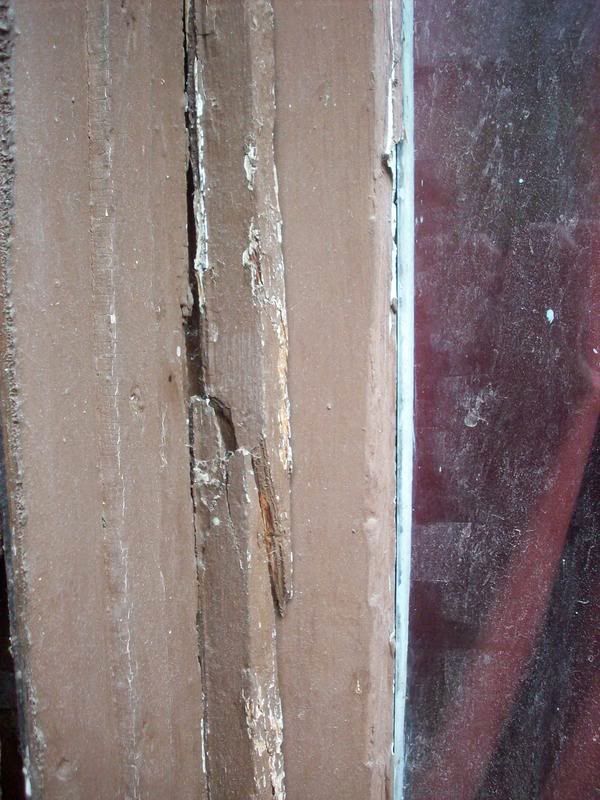
Here's a picture of one of the worst offenses...
Photobucket
You can see that the parting bead is cracked, and the glazing is in less than desired (virtually non-existent) condition.

Replacement Windows- VINYL

There is lots of information out there about how wonderful vinyl replacement windows are. Unfortunately, most of it is from the vinyl window trade. (I have yet to find an independent study). I am not convinced.

For starters, vinyl windows have an industry stated life of 10 to 15 years... 2 years before the special Argon gas escapes and you are left with air, 10 years before moisture makes its way into the space and starts to fog the window. My wood windows have lasted for 100 years... and I would expect nothing less of any other window.

Second, vinyl windows are full of lead. The lead plus other chemicals off-gassing into the house can't be good. I will take my lead painted windows, carefully encapsulated in fresh paint or safely stripped of all lead paint, over a window that will release lead no matter what.

Third, the manufacturing process for vinyl windows can't be environmentally friendly, and the energy required to make them is certainly more than I will expend restoring old windows.

More information:
Blue Vinyl is a wonderful documentary about vinyl siding and its effects on people and the environment. Most of the information applies directly to windows. It's worth a look.

Jeanie at House in Progress has created a fabulous essay on the (de)merits of vinyl windows. There quite a lot of interesting information there. Be sure to click on the links and read the tables/charts.

Replacement Windows- WOOD

Replacement wood windows sound like a comparable option to your existing wood windows. However...

Newly harvested wood is not comparable to old wood. New wood is from quick growth forests and farmed trees... harvest young after only 30 years or so. It is much less dense than old growth wood, and rots/dents/breaks much easier. I have heard of new wood windows rotting out in 15 years. Also, the softer wood does not provide the same level of insulation as heavy, dense wood does from wind.

Wood windows are also much more expensive, are often clad with vinyl or have vinyl tracks, and still require a significant amount of energy to create. (Plus, your old windows end up in the landfill).

New wood windows are the best option, however, if it comes to replacement.... as long as you pick woods like cedar and mahogany, and make sure there is no vinyl or aluminum cladding or sliders.

Restoration
This leaves us with restoration. Your 100 year old wood windows have lasted this long; properly restored, they will last another 100 years or more. Restoration also keeps wood and glass out of the landfill.

By simply adding a properly fitted storm window to a properly functioning single paned, double hung window, you will increase the r value by more than 2, and bring it up to the r value of all but the beefiest replacement windows. Adding drapes or blinds will decrease this difference.

Our plan is to reglaze our windows and make sure they are working properly. They have aluminum triple track storms right now... eventually I want to make period appropriate storms out of wood instead. I hope to be able to compare our new wood/aluminum clad double paned Pella window with our original windows for some real life data... I promise to share it no matter how it turns out.

I'll leave the nitty gritty details on window restoration as I figure them out... stay tuned!

The Numbers
In the September, 2007, issue of Old House Journal there are some numbers crunched on monetary savings. I will leave you with them.

Estimates made with 3'x5' window; gas heat @ $1.09/therm.

Single-pane Original Wood Window with Storm Window
Cost for storm = $50*
Annual energy savings = 722,218Btu
Annual savings per window = $13.20
Simple payback = 4.5 years
*This cost is way too low for most storms. The numbers still work out in the favor of this option with a cost of $150 per storm, however

Double-Pane Thermal Replacement of Single Pane Window (No Storm)
Cost $450.00
Annual Energy savings = 625,922 Btu
Annual Savings per window = $11.07
Simple payback = 40.5 years

Double-Pane Thermal Replacement (Low E Glass) of Single-Pane Window (No Storm)
Cost = $550.00
Annual Energy Savings = 902,722 Btu
Annual Savings per window = $16.10
Simple payback = 34 years

Double-Pane Thermal Replacement (Low E Glass) of Single-Pane Window WITH Storm
Cost = $550.00
Annual Energy Savings = 132,407 Btu
Annual Savings per window = $2.29
Simple payback = 240 years

Source: http://www.oldhouseweb.com/forums/viewtopic.php?f=2&t=14583&st=0&sk=t&sd=a&hilit=window+ratings


Sunday, September 14, 2008

Stop the Leaks Check-In

Sorry for the late post; I'm really sick and had family in town this weekend. What have you all been up to?

Despite the nagging cough, fever, and sniffles, I have double/tripled paned some back windows with plastic, and laid plans for sealing around the windows on the exterior, thanks to your wonderful suggestions about foam and caulk. I'm also gathering fabric for thick curtains and window insulators, and digging out the old draft dodgers. I've also dusted off the programmable thermostat we installed a few years ago, and made sure that the batteries were fresh, and that the program was sufficient for this year's schedule.


Friday, September 12, 2008

Shrink Wrapping Windows

To help Stop the Leaks at our house, I shrink wrapped the huge windows in the back addition. They are HUGE double paned windows that take up most of the back wall, and create our biggest heat loss each winter; there have been ice crystals on the inside at times.

Here's a picture of the smaller of the two monstrous windows:
Photobucket
Notice the small forest growing in the back yard? We've neglected it in the name of keeping the house from falling down and winterizing.

We used a store bought Window Insulation Kit and a hairdryer (bought at Goodwill for $3.99):
Photobucket

To shrink wrap your windows, you will need to first clean your windows. You can use a commercial product, or a mixture of vinegar and water.

Carefully apply the double sided tape to all sides of the window, following the instructions on the package. Cut your shrink wrap to the desired size (leaving an inch or two on all sides), and then apply it to the top of the window. Pull it taut to both sides and press firmly to seal. Seal the bottom last.

Take your hairdryer, turn it on, and carefully move it back and forth over the window, staying about 1 inch away from the plastic. Dry until all wrinkles are smoothed out.

If you need more visual help, Robj98168 posted a helpful video on his blog; it's for exterior shrink wrap, but it's pretty much the same.

This is the best option for windows that you won't open ever; I don't plan on taking it down until we remove those windows from the house!

Monday, September 8, 2008

Furnace Filter Update

I am sure you have all been dying to hear about our furnace filter adventures...

Here's our furnace filter before:
Photobucket
Notice how it was definitely not sealing anything. I'm also not convinced anymore that it is actually a hammock filter furnace, despite the sticker on the exterior... but I can't figure out what else would work.

I removed the old filter, vacuumed out the excessive dust accumulated in the blower compartment, and then rigged up this:
Photobucket
Thanks to Muskego Jeff and Robj98168 for their advice!

I'll still probably have an HVAC person come out and take a look when we next have $50, but it will certainly work better than the previous filter. Here's to a (more) dust-free winter.

SPECIAL BONUS FURNACE:
It's time now for your special bonus furnace question! My sister has a Chrysler Airtemp 4208-04BD furnace that she has been struggling to fit a filter into. Last year she used a 16x20 that she jammed into the front bracket and held in place with a brick. There was still a good sized gap. According to her, there is some sort of bracket at the front and a not quite matching one that you can kind of see in the photo at the back.
Photobucket

Now THAT'S an old furnace. My initial reaction is that it is a smaller than 1 inch slab filter. Find a 1/2 or 3/4 inch filter to the exact size of the opening between the brackets, and slide it in. Hard to tell from pictures, though. Anyone have this furnace or have thoughts?

Sunday, September 7, 2008

Stop the Leaks! Update

What have you all been doing to increase your home's efficiency this week? I'd love to hear about everything you've been doing!

We have been struggling with our furnace air filter situation. I'll update as soon as we get it figured out. I'm planning on moving onto windows this week; storm windows, heavy lined curtains, and more!

Thursday, September 4, 2008

Changing Your Furnace Filter

Changing (or cleaning) your furnace filter every 60 days will increase the efficiency of your home. A clean filter maximizes your furnace's efficiency and longevity and minimizes your energy bills. It also decreases allergens and morning sniffles due to dust build up.

Most of us (ourselves included) have never touched our furnace; NOW is the time to dig in there and figure out your furnace filter.

How to Replace Your Furnace Filter:

First, locate the air filter. Depending on the furnace design, it can either be located in the blower door unit itself or located between the blower and the return air duct. You may need a screwdriver to help pry open the access panel or blower door.

Steps to Changing a STANDARD Furnace Filter:
1) TURN OFF YOUR FURNACE! (Throw the breaker or pull the fuse to it, also).
2) Locate your furnace filter and determine the type. If you are lucky, there will be a diagram label on your furnace showing where. If not, it can either be located in the blower door unit itself or located between the blower and the return air duct. (There may be screws holding the panel on; use a screwdriver to remove them).
3) Remove the old filter.
4) Wash reusable filters; go out and buy a new filter for single use filters. If you are replacing a disposable furnace filter; think about putting a cleanable filter in instead. Make sure to purchase one that is electrostatic. This will reduce your overall landfill waste, and these filters are better than the standard cheap panel filters.
5) Install new furnace filter. Close furnace back up, turn power and furnace back on.
6) Every 30 to 60 days, clean or replace the new filter.

Everyone, go and change your furnace filter and start your winter out right!

Notice these are the steps for a modern furnace. Our furnace at Tiny Old House is not so modern, and uses a hammock type filter. I'll discuss this later, as I figure it out!

Again, if you would like to join us...

Tuesday, September 2, 2008

Stop the Leaks! Who's With Me?

Photobucket
With the rising costs of heating fuel (natural gas in our case) AND concerns about dependence on fossil fuels (both domestic and foreign), we need to do do something this year. Here at Tiny Old House, we plan on spending the next month "stopping the leaks" in our house to save both money and help the environment. Get ready winter, because here we come!

On this blog, I'll focus on a few projects each week that will help improve energy efficiency and keep the chill away; some will be old and some brand new. With our house exterior and windows newly exposed to the elements, we have a LOT of work to do, too. Windows to caulk and seal, storms to replace, doors and windows to weatherstrip, and more!

I'm challenging each one of you to join me; projects are always more fun as a group. We learn so much from each other, too. I'll post links to the "challengees" in my sidebar under the challenge button so you can find others who are working towards the same goals; also, I'll post weekly "round ups" on Sundays for successes and failures, new ideas and finished projects. Come join us... it'll be fun!

To join, leave a comment below! If you'd like the nifty little challenge button I created, copy this code into your blog:

<a href="http://tinyoldhouse.blogspot.com/2008/09/stop-leaks-whos-with-me.html"></a><a href="http://tinyoldhouse.blogspot.com/2008/09/stop-leaks-whos-with-me.html"><img src="http://i81.photobucket.com/albums/j211/jennifermollyandkirby/P3220136-1.jpg" /></a>

Wednesday, March 5, 2008

Update on Danby Washer and Dryer

It's been 3 days and 5 loads of laundry (I've been washing EVERYTHING to see how it works) since we got our new Danby washer and dryer. To review, it is Energy Star rated, front loading, and small; the old set was top loading and huge.

Here's why I am in LOVE with my new washer and dryer:

Our washer drains into the same pipe as the sink; for some reason (faulty plumbing, I would assume), the water drained out of the old washer had always backed up into the sink as it drained, as there is too much water to go down at once. It would fill the sink up most of the way in overflow drainage... and it would do this 3 times during a cycle.

The NEW washer does NOT fill up the sink at all! It does not drain enough water at once to overload the drain... and it still drains those three times. I ran over to the sink to check during the first 3 loads.

That is a LOT of water saved each time we run the washer!

Plus, the spin cycle on the washer (we have it set to 1000 rpm) pulls a LOT of water out of the clothes, so the drying time isn't as long. I was used to drying clothes for more than an hour in the old dryer. Now, it takes about 30 minutes.

That is a LOT of electricity saved each time we run the dryer!

Finally, I use 1/2 TBSP of laundry detergent for every load in the new machine. I used to put in 3/4 cup of detergent to get my clothes clean in the old top loader.

That is a LOT of detergent saved each time we wash our clothes!

Sunday, March 2, 2008

What a Trade! (or Simple Amusements)

Thanks to some wonderful suggestions you all made on my backroom plans, I started looking at stackable washers and dryers for our laundry room. I was in research mode; I wanted to see what a nice used stackable set would cost us, and how much we could get for our existing HUGE General Electric washer and dryer.

I searched through Craigslist (I search Craigslist for everything), and discovered a couple that wanted to TRADE their Danby Energy Star efficient, compact, stackable, and front-loading washer and dryer set for a BIG washer and dryer... exactly what we have.

We unhooked our extra larger washer and dryer (It is AMAZING how much dirt and dust collects behind your washer and dryer!), and drove down to Denver to trade.

We just hooked up the new set and popped in a load of whites... it is SO QUIET! I can barely hear it. And, it filled up with a QUARTER of the water that our old washer used. We sat and watched the washer work for 15 minutes... it's quite fun to watch a front loader washing machine work. Simple amusements for simple people.

We haven't used the dryer yet, but I have high hopes. The only negative that I can see to this set is that it is somewhat small... it only holds medium to large loads. That is not a problem for the two of us in our tiny house, luckily.

I can't wait to see what our electric and water bill savings will be. Here's to saving just a little more of the earth AND saving space and money.

Thursday, January 17, 2008

Draft Dodgers

Are you finding that your old house is drafty and cold as winter settles in? Make a draft dodger to place at the bottom of the door. This will block some of those chilly drafts and keep your heating bill lower.

To make a draft dodger:
1) Fill two old tube socks with sand, tie, and place against door.
OR
2) Take a piece of fabric that is 13 inches tall and as long as your door (32 inches in my case). Fold it in half so the fabric is now 6.5 inches by 32 inches (or so). Sew a straight line down the edge. You may want to sew it twice for reinforcement. Turn the tube inside out, sew one end closed, fill the tube with sand, sew the other end closed, and place against door.

As part of my challenge to ReThink It, I spent some time looking through my clothing donation/rag bag for suitable cloth. I found two parts of brown corduroy pants with big rips and stains. I created a long piece of color blocked fabric by cutting out matching squares and sewing them together.

Photobucket

I made two draft dodgers for our outside doors. Here's to a slightly toastier winter!

Materials:
Fabric: old pants
Sand: leftover from patio project

Cost: $0

You Know It's Cold When...

you do the household chores you have been lazily putting off simply because doing them will heat the house!

So far I have washed 2 loads of white laundry on HOT, dried them using our electric dryer with the vent venting INSIDE, and started the dishwasher. I'm thinking I should also make some soup stock, too... just to have on hand. That will warm the house up.

Have I turned the head above 54? No... I'm too cheap. I'm not touching that thermostat!

Friday, January 11, 2008

New Years Resolutions 2008, Part 2- Lessening Our Consumption and Enriching our Lives

A few days ago I posted a list of New Year's Resolutions pertaining to our house and its remodeling. Though long and exhaustive, it is not a complete list of goals for the year.

My husband and I have become increasingly concerned with environmental concerns. Over the last year or two we have obtained reusable grocery bags, searched Habitat ReStores, Craigslist, and Freecycle for needed building supplies instead of buying new, made a concerted effort to buy from the farmer's market first, and more.

Here is what we want to do this year to lessen our impact and improve our life:

Build Efficient Compost Piles
We already compost by dumping organic matter into the space between the fence and the garage. It doesn't compost very fast, however. I want to build a series of two or three compost bins to rotate the material between in this space. I even have the material: pallets that I salvaged from the scrap wood pile at the city recycling center. Some decking screws and time, and I can have a great set of bins with lots of airflow.

Plant Buffalo Grass (or other native grass)
When we finish the backyard we hope to seed with drought tolerant grasses. Why grass at all? We have dogs. A pretty lame excuse. For the past 2 years I have watered our front lawn (which is fine fescue) about 3 or 4 times a year... hopefully after establishment a native backyard will need that or less.

Use My Human Powered Lawnmower
I received a great present this year: a Brill Luxus 38 Lawnmower. My goal is to NEVER use the old gas powered one in the garage.

Replace the Front and Back Doors
We lose a substantial amount of heat out of our backdoor. I recently discovered that it is actually a hollow core INTERIOR door. No wonder the laundry room (and our bedroom) is 10 degrees colder than the rest of the house! The front door is in better shape, but rotting and cracked.

Seal ALL Windows and Doors/Apply Weatherstripping
Much heat is lost through cracks around doors and windows. Adding weatherstripping will make a big difference.

Bed Warmers
We drop the heat by quite a bit at night. We use two fluffy down comforters to keep warm. While at my parent's house this Christmas, however, we were introduced to the delights of a bedwarmer, which might allow us to drop the heat even further. We are looking to either find an old metal one to fill with heated water (reused, of course) or make one out of cherry pits. Of course, I may keep an eye out for one of these...

Shop at the Farmer's Market FIRST

We made a valiant effort this past summer to make it to the farmer's market every week before grocery shopping. We forgot a few times. This summer, I want to make it EVERY week.

Join a CSA

In addition to the Farmer's Market, I want to investigate (and hopefully join) a CSA (Community Supported Agriculture). I know there will be foods that we have no idea what to do with (thinking beets and squashes off the top of my head), so an additional goal is to learn to cook those foods.

Plant a Vegetable Garden

Our backyard is nearing completion. I want to finish the vegetable garden beds by April in the hopes of planting tomatoes and cucumbers and all sorts of yummy foods. I also want to more fully intersperse herbs into my flower beds.

Replace Old Plastic Tupperwares
We have a large drawer of plastic. Most of it is old yogurt and cheese containers that we repurposed for use as tupperware. We have become increasingly concerned with plastic leaching into our foods during storage and reheat, and so are looking to buy some glass containers. No worries... the old plastic will NOT be trashed. I have so many home improvement things such as nails, screws, tape, etc that would LOVE a home in a nice small container!

Find or Make Reusable Produce Bags

I found some great bags here, but the shipping from Canada is outrageous. I am hoping to make or find something similar to carry produce home in.

Buy Only Used (as much as possible)

Somewhat self explanatory. My resolution is to look at thrift stores, reuse stores, and the internet to find what I need used BEFORE I look for new. Especially clothes. Except underwear and socks.

Thursday, January 10, 2008

ReThink It!

I am taking Chile of Chile Chews up on her challenge to Rethink It:
Reduce-Reuse-Recycle: Rethink it! The purpose of this challenge is to help you reduce your consumption, expenses, and garbage by getting you to think about every aspect of the recycling logo. Break out of old habits and find new ways to reduce your consumption, reuse what you can in creative ways, and recycle everything else.
How can I break the mold? What can I do better to reduce my consumption? What can I reuse instead of throwing away? More to follow.

Friday, November 16, 2007

Look at all the Energy we SAVED!!!

One of the first things we did to our house was install a programmable thermostat. We chose this Honeywell 5-2 Day Programmable Thermostat. $30 later...

This is what we set the thermostat to:
Year 1: 62º (No programmable thermostat)
Year 2: 62º During the Day, 54º at Night and While Gone

Table 1, Monthly Therm Usage

Year 1, Year 2
October: 47 Therms, 30 Therms
November: 24 Therms, 19 Therms
December: 96 Therms, 75 Therms
January: 113 Therms, 63 Therms
February: 69 Therms, 71 Therms
March: 72 Therms, 50 Therms

Average: 70.16, 51.33
Total: 421 Therms, 308 Therms

Table 2, Monthly Outside Temperature

Year 1, Year 2
October: 53º, 56º
November: 44º, 46º
December: 32º, 29º
January: 29º, 38º
February: 37º, 29º
March: 39º, 36º

Average: 39º, 39º

We saved 19 therms a month, simply by installing a programmable thermostat! Installing the thermostat took about 20 minutes of our lives. WELL worth it! We have definitely saved our $30 many times over.

Cost: $30

Saturday, November 10, 2007

Ways to "Go Green"

I was flipping through the October 2007 issue of This Old House. The "theme" of the issue was green remodeling ideas, and I thought great! This will be so useful, as I am trying to make as little of an environmental impact as possible on my house.

Unfortunately, most of the magazine was dedicated to expensive ways to save energy by buying new, and new products that are theoretically manufactured using "green" techniques. I am much more interested in information about how to retrofit existing houses with a much smaller consumer footprint, and information on how to use old materials.

Now, before I completely trash the magazine issue, there was a nice article on 22 Little Ways to Go Green, with a number of somewhat useful ideas. We already do most of them, however... no shoes in the house for instance. But, the list is a nice reminder of some of the more basic ways to improve your energy efficiency.