Sunday, September 28, 2008

Stop The Leaks! Last Week for September

How did everyone do this week? It's getting colder here at night... a nice push to getting things sealed up.

This past week, we worked on plugging the huge hole in our house with a window; while the new, bigger window will likely leak more heat than the former sided wall, once we removed the siding there was no going back. We wedged foam backing around the entire window on both the inside and outside to reduce drafts, and caulked very well on the inside.

Our brick repair around the outside windows won't be finished for a couple weeks, so I'm going to concentrate on our new front door this week. Once the brick is done, it will be a mad dash to seal up the outside of the windows before the snow flies.

I'm going to continue "Stopping the Leaks" at my house in October... I'll leave the banner up (and if I get around to it, change the month), and leave everyone up who wants to continue in October. Feel free to add yourself!


Tuesday, September 23, 2008

Dealing With Windows- The Energy Efficiency Edition

The windows on our house are in need of SOMETHING to make them more energy efficient. But what? There are so many options...

Here's a picture of one of the worst offenses...

Photobucket
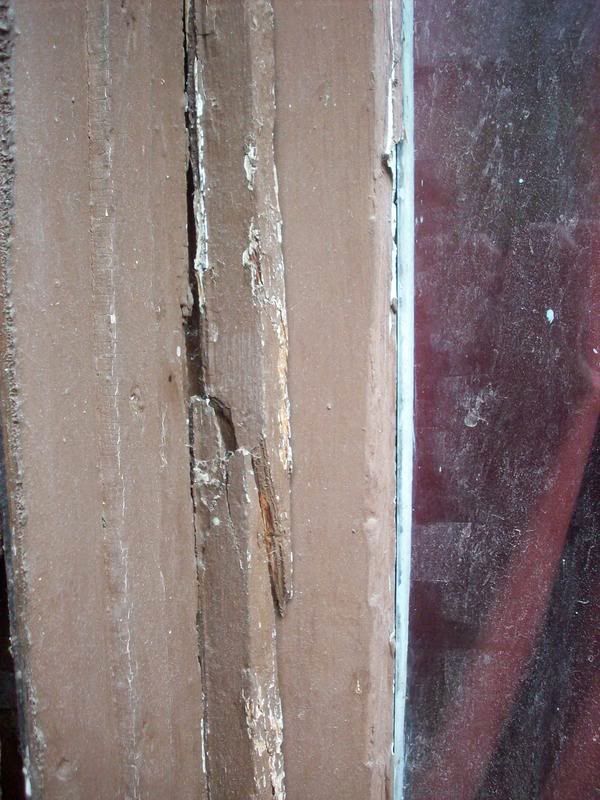
You can see that the parting bead is cracked, and the glazing is in less than desired (virtually non-existent) condition.

Replacement Windows- VINYL

There is lots of information out there about how wonderful vinyl replacement windows are. Unfortunately, most of it is from the vinyl window trade. (I have yet to find an independent study). I am not convinced.

For starters, vinyl windows have an industry stated life of 10 to 15 years... 2 years before the special Argon gas escapes and you are left with air, 10 years before moisture makes its way into the space and starts to fog the window. My wood windows have lasted for 100 years... and I would expect nothing less of any other window.

Second, vinyl windows are full of lead. The lead plus other chemicals off-gassing into the house can't be good. I will take my lead painted windows, carefully encapsulated in fresh paint or safely stripped of all lead paint, over a window that will release lead no matter what.

Third, the manufacturing process for vinyl windows can't be environmentally friendly, and the energy required to make them is certainly more than I will expend restoring old windows.

More information:
Blue Vinyl is a wonderful documentary about vinyl siding and its effects on people and the environment. Most of the information applies directly to windows. It's worth a look.

Jeanie at House in Progress has created a fabulous essay on the (de)merits of vinyl windows. There quite a lot of interesting information there. Be sure to click on the links and read the tables/charts.

Replacement Windows- WOOD

Replacement wood windows sound like a comparable option to your existing wood windows. However...

Newly harvested wood is not comparable to old wood. New wood is from quick growth forests and farmed trees... harvest young after only 30 years or so. It is much less dense than old growth wood, and rots/dents/breaks much easier. I have heard of new wood windows rotting out in 15 years. Also, the softer wood does not provide the same level of insulation as heavy, dense wood does from wind.

Wood windows are also much more expensive, are often clad with vinyl or have vinyl tracks, and still require a significant amount of energy to create. (Plus, your old windows end up in the landfill).

New wood windows are the best option, however, if it comes to replacement.... as long as you pick woods like cedar and mahogany, and make sure there is no vinyl or aluminum cladding or sliders.

Restoration
This leaves us with restoration. Your 100 year old wood windows have lasted this long; properly restored, they will last another 100 years or more. Restoration also keeps wood and glass out of the landfill.

By simply adding a properly fitted storm window to a properly functioning single paned, double hung window, you will increase the r value by more than 2, and bring it up to the r value of all but the beefiest replacement windows. Adding drapes or blinds will decrease this difference.

Our plan is to reglaze our windows and make sure they are working properly. They have aluminum triple track storms right now... eventually I want to make period appropriate storms out of wood instead. I hope to be able to compare our new wood/aluminum clad double paned Pella window with our original windows for some real life data... I promise to share it no matter how it turns out.

I'll leave the nitty gritty details on window restoration as I figure them out... stay tuned!

The Numbers
In the September, 2007, issue of Old House Journal there are some numbers crunched on monetary savings. I will leave you with them.

Estimates made with 3'x5' window; gas heat @ $1.09/therm.

Single-pane Original Wood Window with Storm Window
Cost for storm = $50*
Annual energy savings = 722,218Btu
Annual savings per window = $13.20
Simple payback = 4.5 years
*This cost is way too low for most storms. The numbers still work out in the favor of this option with a cost of $150 per storm, however

Double-Pane Thermal Replacement of Single Pane Window (No Storm)
Cost $450.00
Annual Energy savings = 625,922 Btu
Annual Savings per window = $11.07
Simple payback = 40.5 years

Double-Pane Thermal Replacement (Low E Glass) of Single-Pane Window (No Storm)
Cost = $550.00
Annual Energy Savings = 902,722 Btu
Annual Savings per window = $16.10
Simple payback = 34 years

Double-Pane Thermal Replacement (Low E Glass) of Single-Pane Window WITH Storm
Cost = $550.00
Annual Energy Savings = 132,407 Btu
Annual Savings per window = $2.29
Simple payback = 240 years

Source: http://www.oldhouseweb.com/forums/viewtopic.php?f=2&t=14583&st=0&sk=t&sd=a&hilit=window+ratings


Monday, September 22, 2008

Replacing My Too-Small Window

This weekend we sealed a very LARGE leak... the leak around our too small window. Here's the before shot (sorry about the ladder):

Photobucket

At some point in the house's history, the full sized window was removed, and replaced with a nice, but way too small window. You can see the framing below and to the sides of the window if you look hard... it's the window on the right. The original frame was left in place; only the sashes are missing.

As we deconstructed, we discovered WHY it was replaced... take a look at these pictures:
Photobucket
Photobucket

Notice the significant charring on the original window frame, and the soot staining on the brick and upper wood? There was a house fire in this room at some point! We knew when we bought that there had been a house fire... the rafters are slightly charred and have been sistered to new rafters. We didn't know WHERE the fire had been, though. My guess is that it was in this bedroom, and the window burned in the fire.

Here's the hole in my study:
Photobucket

Photobucket

And, the very nice window we removed:
Photobucket
We are saving it for use on the back addition. The sash weights work perfectly, and it only needs a little reglazing!

We bought a $10 reciprocating saw at the local pawn shop; this was worth its weight in gold for removing the old window intact. I can't believe we have done so much without it; the kitchen cabinets would have been much easier with it!

Here is the newer window we used:
Photobucket
It's a wood, aluminum clad Pella window. It happens to be double paned/glazed. We are using it because it was $60 at the Habitat ReStore, and was the only window we could find used in our dimensions. As a bonus, it happens to have the same trim profiles on the interior.

(An aside... I may do a "test" to compare this double paned window with an original window to compare heat loss, as I have an original on the same wall. Should be interesting!)

Though this is a new construction window, we installed it into our existing hole. We removed the sides and top of the existing (charred) frame, and secured the new window through a combination of masonry screws and nails into the wood header and footer.

We applied foam backer around the window:
Photobucket

We also caulked around the entire inside of the window. We will finish the outside once our brick work is done around that window.

Afters:
Photobucket
Photobucket

The room is already much nicer with such a large window in it! Now to pick out trim for the whole house.

Sunday, September 14, 2008

Stop the Leaks Check-In

Sorry for the late post; I'm really sick and had family in town this weekend. What have you all been up to?

Despite the nagging cough, fever, and sniffles, I have double/tripled paned some back windows with plastic, and laid plans for sealing around the windows on the exterior, thanks to your wonderful suggestions about foam and caulk. I'm also gathering fabric for thick curtains and window insulators, and digging out the old draft dodgers. I've also dusted off the programmable thermostat we installed a few years ago, and made sure that the batteries were fresh, and that the program was sufficient for this year's schedule.


Friday, September 12, 2008

Shrink Wrapping Windows

To help Stop the Leaks at our house, I shrink wrapped the huge windows in the back addition. They are HUGE double paned windows that take up most of the back wall, and create our biggest heat loss each winter; there have been ice crystals on the inside at times.

Here's a picture of the smaller of the two monstrous windows:
Photobucket
Notice the small forest growing in the back yard? We've neglected it in the name of keeping the house from falling down and winterizing.

We used a store bought Window Insulation Kit and a hairdryer (bought at Goodwill for $3.99):
Photobucket

To shrink wrap your windows, you will need to first clean your windows. You can use a commercial product, or a mixture of vinegar and water.

Carefully apply the double sided tape to all sides of the window, following the instructions on the package. Cut your shrink wrap to the desired size (leaving an inch or two on all sides), and then apply it to the top of the window. Pull it taut to both sides and press firmly to seal. Seal the bottom last.

Take your hairdryer, turn it on, and carefully move it back and forth over the window, staying about 1 inch away from the plastic. Dry until all wrinkles are smoothed out.

If you need more visual help, Robj98168 posted a helpful video on his blog; it's for exterior shrink wrap, but it's pretty much the same.

This is the best option for windows that you won't open ever; I don't plan on taking it down until we remove those windows from the house!

Tuesday, September 9, 2008

Exterior Window Moldings...

When we removed the siding, we were left with ugly window trim:

Photobucket

All of the tan trim surrounding the window is not original; much of it is rotting, and it sticks out beyond the brick. It is also not sealed against the brick. The original windows (as seen from neighboring homes) were trimmed out inside the brick opening. We want to remove the tan trim and replace it with something much more suitable.

Here is a window without the tan trim:
Photobucket

This looks much better, and is more historically accurate (again, given surrounding houses). The problem is the gaps:

Photobucket
Photobucket

The quarter round molding currently on the outside of the window frame appears to be newer (it is missing the first layer of paint); it's broken in places and needs replaced anyway. My thought is to pry it off, and replace with a 1 inch deep block molding that will reach from the brick to where the storm windows will start.

Issues that need solving: Do I caulk between this wood molding and the brick? If not, how to I seal between the brick and wood?

Monday, September 8, 2008

Furnace Filter Update

I am sure you have all been dying to hear about our furnace filter adventures...

Here's our furnace filter before:
Photobucket
Notice how it was definitely not sealing anything. I'm also not convinced anymore that it is actually a hammock filter furnace, despite the sticker on the exterior... but I can't figure out what else would work.

I removed the old filter, vacuumed out the excessive dust accumulated in the blower compartment, and then rigged up this:
Photobucket
Thanks to Muskego Jeff and Robj98168 for their advice!

I'll still probably have an HVAC person come out and take a look when we next have $50, but it will certainly work better than the previous filter. Here's to a (more) dust-free winter.

SPECIAL BONUS FURNACE:
It's time now for your special bonus furnace question! My sister has a Chrysler Airtemp 4208-04BD furnace that she has been struggling to fit a filter into. Last year she used a 16x20 that she jammed into the front bracket and held in place with a brick. There was still a good sized gap. According to her, there is some sort of bracket at the front and a not quite matching one that you can kind of see in the photo at the back.
Photobucket

Now THAT'S an old furnace. My initial reaction is that it is a smaller than 1 inch slab filter. Find a 1/2 or 3/4 inch filter to the exact size of the opening between the brackets, and slide it in. Hard to tell from pictures, though. Anyone have this furnace or have thoughts?

Sunday, September 7, 2008

Stop the Leaks! Update

What have you all been doing to increase your home's efficiency this week? I'd love to hear about everything you've been doing!

We have been struggling with our furnace air filter situation. I'll update as soon as we get it figured out. I'm planning on moving onto windows this week; storm windows, heavy lined curtains, and more!

Saturday, September 6, 2008

Wordles on Furnace Filters and Such

A little Friday/Saturday fun! Fred at One Project Closer asked us to provide a wordle of our ongoing projects...
I can't figure out how to get a great screen shot of it, so you'll have to click on the wordle to see it in all its glory. Notice how prominently our new challenge, "Stop the Leaks" is featured!

Friday, September 5, 2008

Look What I Found!

It's taking all of my self control to avoid ripping the floors up right now.
Here's a picture of our cold air return (minus the grate):

Photobucket

Those are tongue and groove floor boards UNDER a layer of nasty carpet and a layer of plywood. They are damp in the picture, since I had just wiped the drywall dust off of them; in real life, they appear to be pine.

Thanks to a tip from a poster on the Old House Web Forums, I ripped off our cold air returns to see if I could simply place furnace filters behind these grates. Unfortunately, these returns are just drywall and studs. I'm pleased to see that my efforts weren't entirely in vain, however!

Thursday, September 4, 2008

Missing Parts and Lots of Dust

I went to change the furnace filter today. We have an early 80's Lennox furnace that uses a hammock style filter. This type of filter is basically a fiberglass sheet clamped onto a wire basket or frame that is inserted by the cold air intake.

Here are the instructions:

Photobucket

There is supposed to be a frame holding the hammock filter in place.

Here is what is actually IN my furnace:

Photobucket

It's just a 2'x3' sheet of fiberglass filter material shoved up there! It is free floating, and not attached or clamped to anything. No WONDER there is dust all over our house.

I called a few heating supply places in town; they don't sell to the general public, and don't even know if they can get the part needed.

Any ideas?

Changing Your Furnace Filter

Changing (or cleaning) your furnace filter every 60 days will increase the efficiency of your home. A clean filter maximizes your furnace's efficiency and longevity and minimizes your energy bills. It also decreases allergens and morning sniffles due to dust build up.

Most of us (ourselves included) have never touched our furnace; NOW is the time to dig in there and figure out your furnace filter.

How to Replace Your Furnace Filter:

First, locate the air filter. Depending on the furnace design, it can either be located in the blower door unit itself or located between the blower and the return air duct. You may need a screwdriver to help pry open the access panel or blower door.

Steps to Changing a STANDARD Furnace Filter:
1) TURN OFF YOUR FURNACE! (Throw the breaker or pull the fuse to it, also).
2) Locate your furnace filter and determine the type. If you are lucky, there will be a diagram label on your furnace showing where. If not, it can either be located in the blower door unit itself or located between the blower and the return air duct. (There may be screws holding the panel on; use a screwdriver to remove them).
3) Remove the old filter.
4) Wash reusable filters; go out and buy a new filter for single use filters. If you are replacing a disposable furnace filter; think about putting a cleanable filter in instead. Make sure to purchase one that is electrostatic. This will reduce your overall landfill waste, and these filters are better than the standard cheap panel filters.
5) Install new furnace filter. Close furnace back up, turn power and furnace back on.
6) Every 30 to 60 days, clean or replace the new filter.

Everyone, go and change your furnace filter and start your winter out right!

Notice these are the steps for a modern furnace. Our furnace at Tiny Old House is not so modern, and uses a hammock type filter. I'll discuss this later, as I figure it out!

Again, if you would like to join us...

Tuesday, September 2, 2008

Stop the Leaks! Who's With Me?

Photobucket
With the rising costs of heating fuel (natural gas in our case) AND concerns about dependence on fossil fuels (both domestic and foreign), we need to do do something this year. Here at Tiny Old House, we plan on spending the next month "stopping the leaks" in our house to save both money and help the environment. Get ready winter, because here we come!

On this blog, I'll focus on a few projects each week that will help improve energy efficiency and keep the chill away; some will be old and some brand new. With our house exterior and windows newly exposed to the elements, we have a LOT of work to do, too. Windows to caulk and seal, storms to replace, doors and windows to weatherstrip, and more!

I'm challenging each one of you to join me; projects are always more fun as a group. We learn so much from each other, too. I'll post links to the "challengees" in my sidebar under the challenge button so you can find others who are working towards the same goals; also, I'll post weekly "round ups" on Sundays for successes and failures, new ideas and finished projects. Come join us... it'll be fun!

To join, leave a comment below! If you'd like the nifty little challenge button I created, copy this code into your blog:

<a href="http://tinyoldhouse.blogspot.com/2008/09/stop-leaks-whos-with-me.html"></a><a href="http://tinyoldhouse.blogspot.com/2008/09/stop-leaks-whos-with-me.html"><img src="http://i81.photobucket.com/albums/j211/jennifermollyandkirby/P3220136-1.jpg" /></a>